-
Contact Us
Contact: Miss Mia
Job Title: Sales Manager
Office Tel: +86-0755-83760688
+86-0755-83174076
Cell Phone: +86 137 9837 4116
Email: szhendi@163.com
Skype: miachanjuan
QQ: 1528310496
Viber: +86-13798374116
Tango: +86-13798374116
Wechat: +86-13798374116
WhatsApp: +86-13798374116
Website: www.en.myq.alibaba.com
Add: Room 14S, Duhui 100 Building, East Of Zhonghang Rd., Huaqiang North St., Futian Dist. Shenzhen, China- Hot Products
-
Home > Instruction
How do I install the printer driver?
Date: 2014-09-13Important note about drivers and settings to use!
1. The only driver that works is on our download site, not on the disc with the printer.
2. Default settings for the printer work great in Windows. No adjustments are needed.
The source technologies disk which ships with the printer contain only drivers meant to be used for normal office printing. Because MICR fonts are a secured resource, a special driver must be used.
The driver that works properly with the MICR fonts in your printer is named "Printer_Universal_UD0_Win_32_PCI_Emul.exe" and is available from the Family Net Download site: http://apps.state.or.us/familynet-app/. Look for the link called Download Universal Driver for ST-9612, 9620 and 9630 Printers. This is a "Universal Driver," which means it works with all 32-bit Windows Operating Systems through Windows 7 and all three of the MICR models of printers.
Without this special driver, you will likely see multiple copies of the FI page printed, and an extra page containing a sequence of garbage characters known as "up side down T, smiley, degree, DIB."
The default settings for the driver work for MICR applications like twist. You no longer need to make updates like you did in the past.
Table of Contents
How do I install the printer driver?................................................................................................
A: To install the printer driver, follow these steps:
1. At this point in the process, your printer should not be plugged into your computer. If it is a USB connection, Windows may attempt to locate the printer driver on its own before we're been able to provide the correct one with MICR support.
2. Obtain the driver file from the family net download site, http://apps.state.or.us/familynet.app. Please note this is not the one on the dics that came with your printer. The link is called: Download Universal Driver for ST-9612, 9620 and 9630 Printers. Save the file to a directory on your computer you can locate later, such as the desktop.
3. The file will be called" Printer_Universal_UD0_Win_32_PCI_Emul.exe". Open this file by double-clicking it, which will automatically extract the files to a temporary directory and run the program.
4. Click the agree button when the license agreement appears.
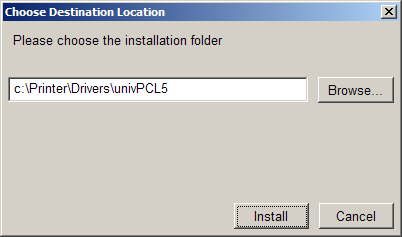
5. Accept the default when the destination dialog apperas and click the install button.
6. Two windows will open after the second extraction. The upper left one shows the Printer Installation Wizard and the lower right one shows directions.
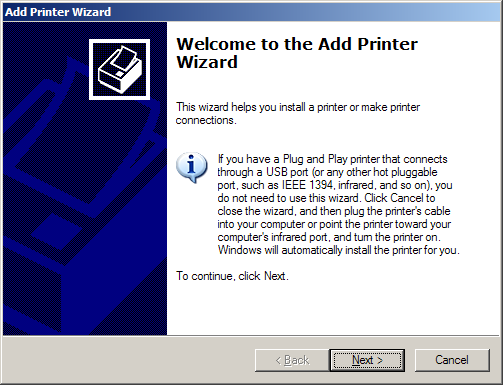
7. Click "Next".
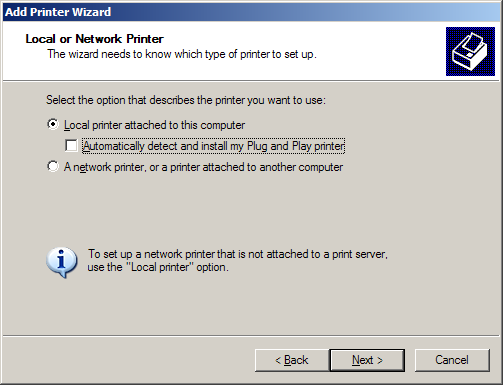
8. If this is a local printer (connected directly to the computer instead of being connected through the network), clear the check box option to "Automatically detect and install my plug and play printer," as shown below. Click "Next". If this is a network, you will need the network address ot the printer. Please consult your local information technology group for assistance.
9. Select the proper port for this printer. If you are connecting the printer with a parallet cable, choose LPT1. A parallel cable is the one with this kind of connector.

If you are connecting the printer with a USB cable, choose USB. Click "Next".
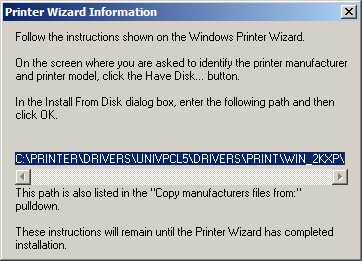
10. The next window allows you to choose the printer driver. At this point, click "Have Disk...".
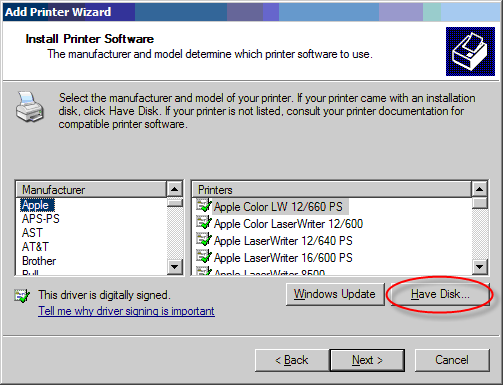
11. The next dialog has a drop down which contains the default location where the files were extracted in the previous step. Select it and click "OK".
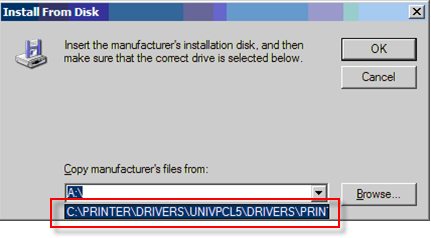
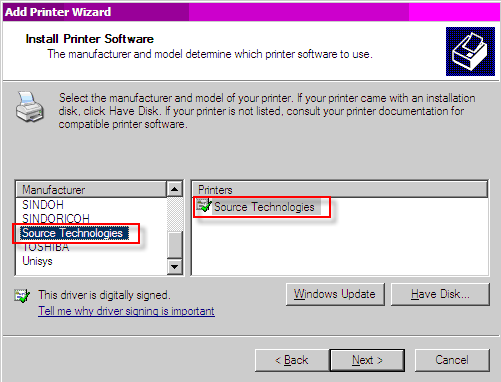
12. The previous dialog will update to show the printer drivers in that directory. Scroll down the manufacturer list to "Source Technologies" and "Source Technologies" will appear under the printers list.
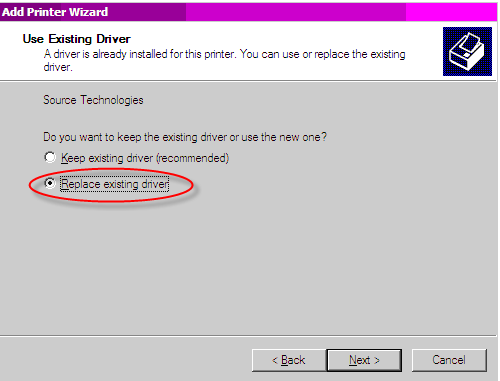
13. If you get a "Use Existing Driver" dialog window asking you if you want to keep the existing driver or use the new one, select "Replace existing driver."
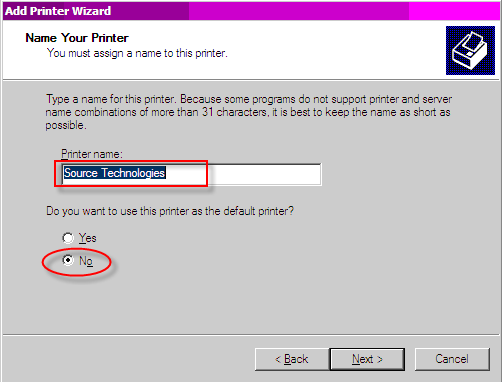
14. Accept the default name of "Source Technologies" for the printer. If you alter the name, write it down for a later step. This is the name we need to give twist to be able to find the MICR printer.
Make sure that "No" is selected for the default printer question.
Click "Next".
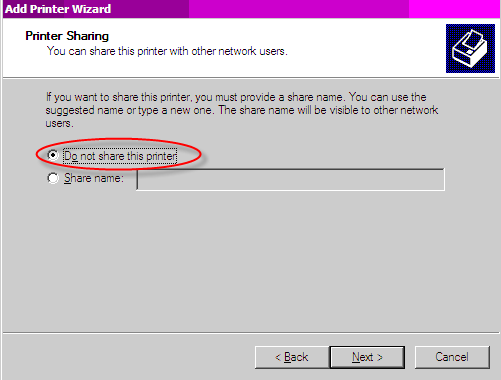
15. Make sure that "Do not share this printer" is selected on the next screen and click "Next".
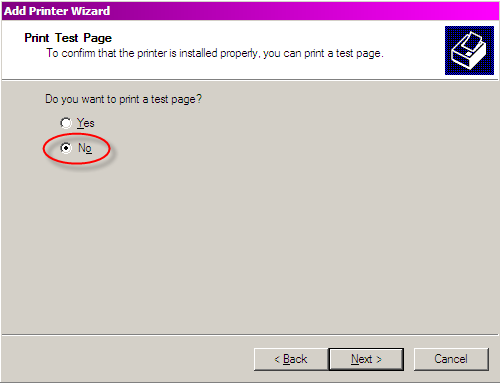
16. Select "No" for the test page and click "Next".
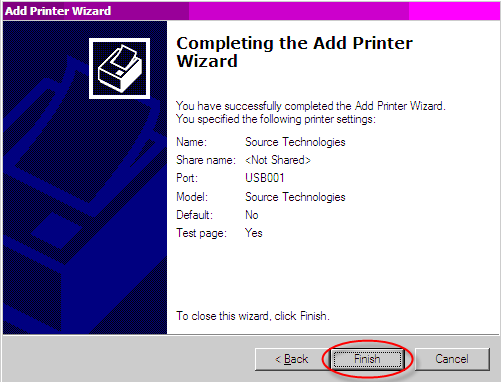
17. Click "Finish" to complete the installation:
18. After the installation is complete, plug in your printer and turn on the power.
19. Click "Start > Settings > Printers and Faxes".
20. In some cases, a second printer will appear as " Source Technologies (Copy 1)" when Windows detects the printer again. If this occurs, follow these steps.
Delete the one you added by right-clicking it and choosing Delete.
Rename the copy by righg-clicking the name and choosing Rename, then delete just the "(Copy 1)" portion from the end, including the space.
21. Right-click on the "Source Technologies" printer or whatever you named it. Choose Properties from the pop-up menu.
22. Click the Print Test Page button on the general tab of the dialog box.
23. You are now ready to enter the printer into the twist food instrument printer list.


-


Copyright 2014-2015 © Shenzhen MYQ Techonology Co.,Ltd All Rights Reserved